Week 6 — Lighting + Interview Lab
Example: Interviews
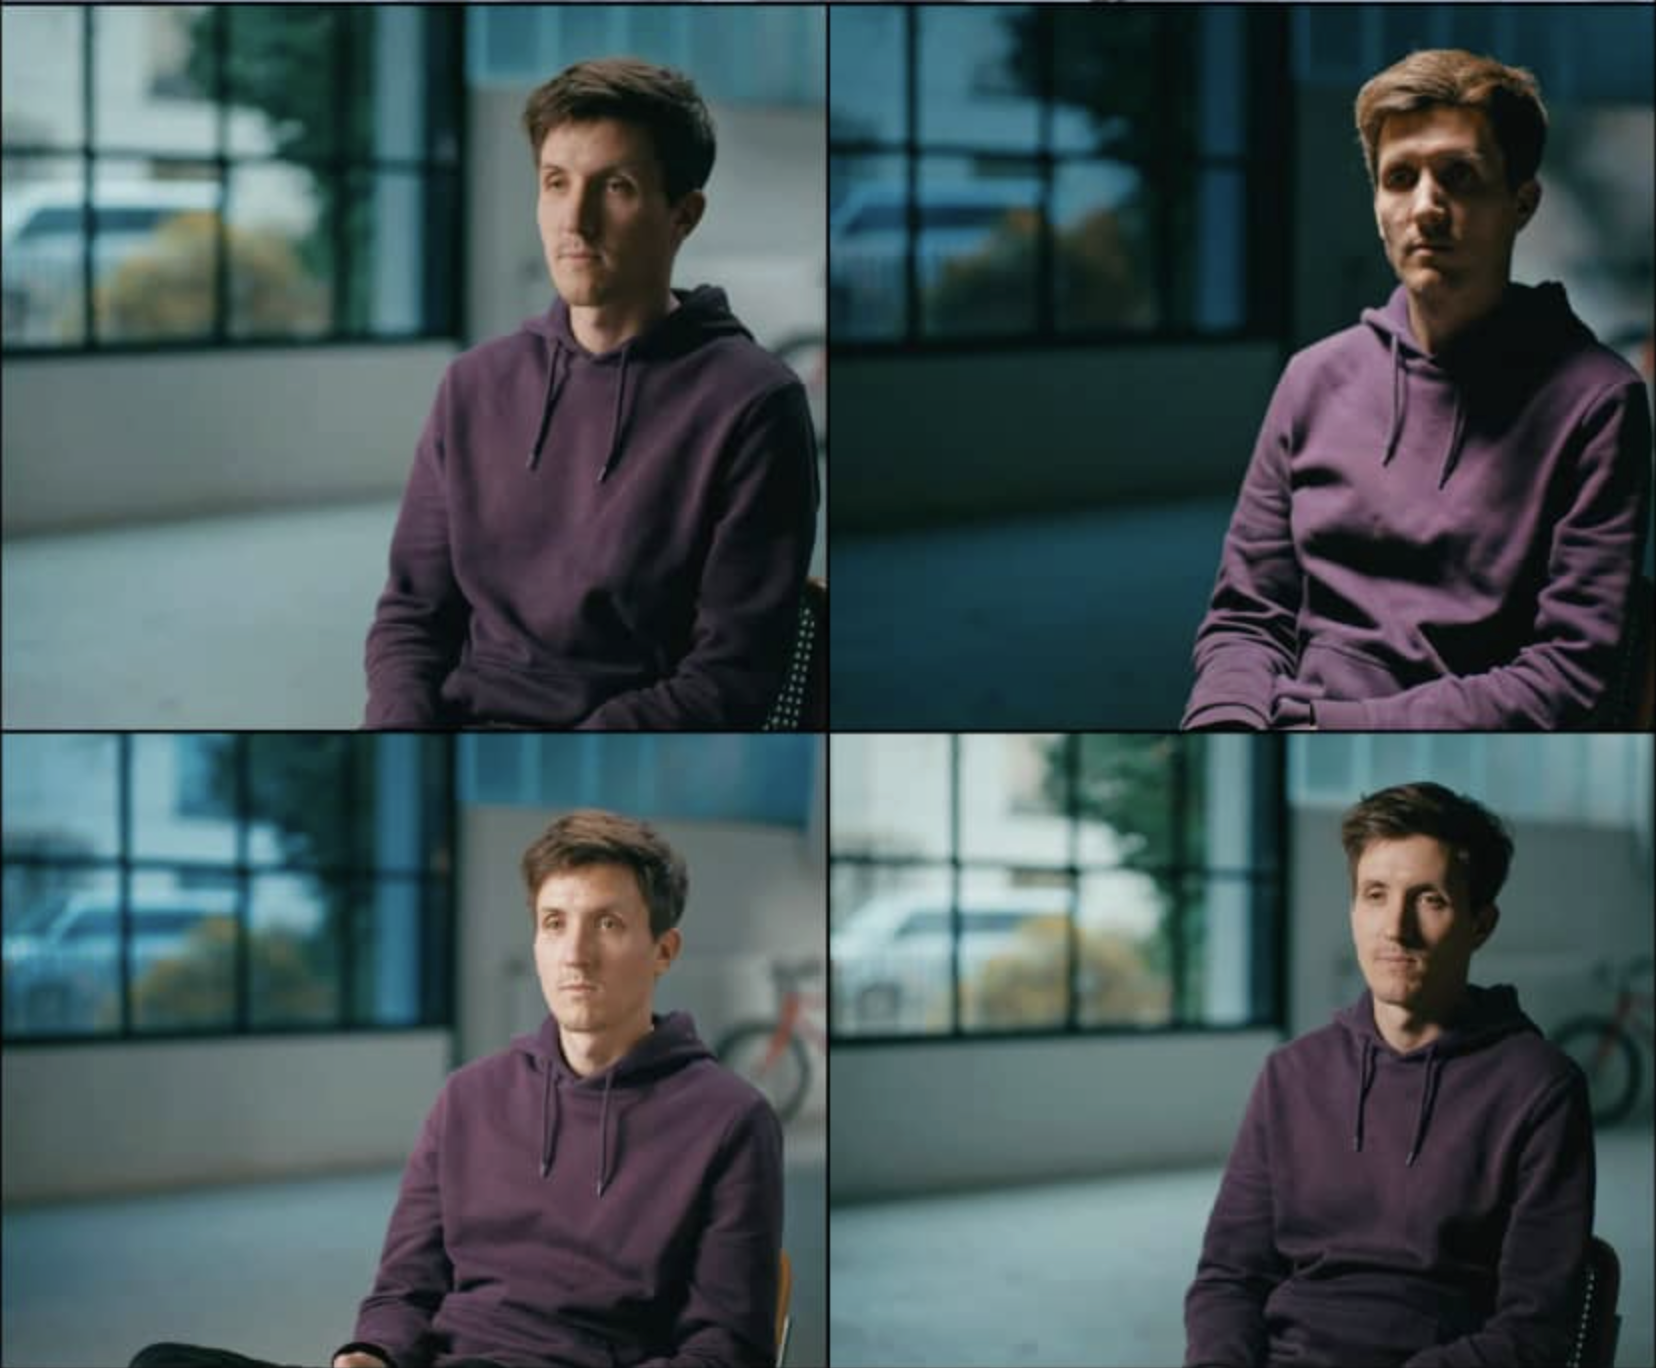
Before breaking down the techniques, watch this sample interview clip. Notice the framing, the light on the face, and the relationship between subject and background.
Direct Address
Soft Light
Multiple Angles
Framing the Interview
Three decisions define interview framing: distance, lens length, and eyeline placement. Each shapes how we read the subject emotionally.
Distance & Lens Length
- Wide lens close-up: distorts features — usually unflattering, feels confrontational or claustrophobic
- Longer lens (50–85mm equivalent): compresses space, flatters the face, separates subject from background naturally
- Frame size: medium close-up (chest up) is the workhorse — intimate without being invasive
- Tighter shots (eyes and mouth) = intensity; wider shots = context, environment, isolation
Headroom & the Empty Frame Side
- Leave slight headroom — not too much (floaty) and not cropped at the top (claustrophobic)
- The subject's nose and eyes should lead into space, not face a wall
- The empty side of the frame is where the imagined interviewer lives — it creates a conversation axis
- Place the subject slightly off-center, on one of the vertical thirds
- Keep eyeline just above or at camera lens height — never shooting sharply up or down unless intentional
Three-Point Lighting: Principles
Three-point lighting is a toolkit, not a formula. The goal is to sculpt a face with intentional shadow and separation. Once you understand each light's job, you can strip it down, exaggerate it, or replace it — depending on the mood you're after.
- Key light: the primary sculptor. Placed at roughly 45° off camera, slightly above eye level. Sets the direction of all shadow.
- Fill light: controls shadow depth. Always weaker than the key. Can be a reflector, a bounced surface, or a dim second source.
- Back / hair light: rim of light from behind that separates the subject from the background. Prevents a flat, merged silhouette.
- Background light (optional fourth): keeps the space behind the subject intentional — depth, texture, or controlled darkness.
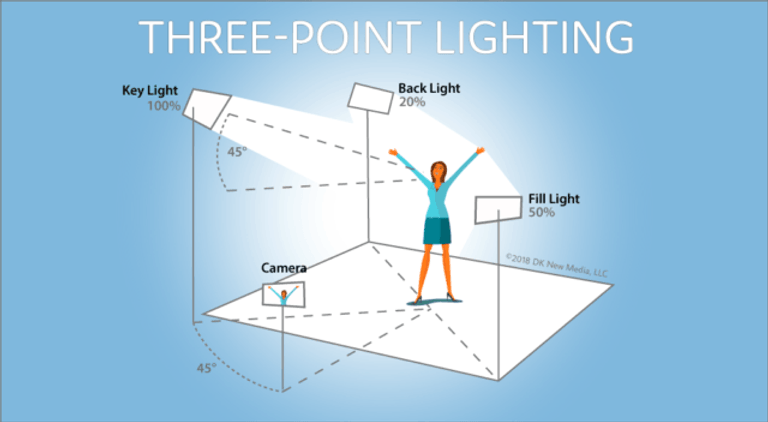
Three-Point Lighting Setup
Lighting Styles for a Interview
High Key Lighting
High key means a high fill-to-key ratio — the fill is strong, shadows are soft or nearly absent, and the overall image is bright and even. It reads as upbeat, safe, commercial, or artificial. It's not necessarily overexposed — it's about minimizing shadow depth. Common in advertising, comedy, and any scene designed to feel open, energetic, or unambiguous.
In Barbie, high key lighting defines Barbieland — a world without shadow or threat.
Low Key Lighting
Low key means a low fill-to-key ratio — strong key, very weak or no fill, which produces deep, dramatic shadows that dominate the image. It's associated with tension, mystery, danger, and moral ambiguity. Not dark overall — contrast. The brights can be very bright; it's the shadow mass that matters.
The hospital scene in The Godfather: Vito Corleone illuminated in a near-dark room, shadows doing the narrative work of showing vulnerability and power at once. Michael's face enters and exits pools of light.
Natural Light & Practical Sources
Motivated light means every light in the frame has an apparent source — a window, a lamp, a fire. When light is motivated, it grounds the scene in a physical reality. The audience senses the world even when they can't name why.
Using a practical lamp (a lamp visible in the frame) does double work: it creates depth in the background and gives you a logical direction for your key light. Place the key to match the lamp's logic — and the whole image gains coherence.
Barry Lyndon's candlelit scenes are the extreme example: Kubrick and cinematographer John Alcott shot entirely by candlelight using a NASA lens.
The Social Network's dorm scenes use artificial light to create the mood of natural, dim ambient light: monitor glow, desk lamps, dim overheads. Soft sources hidden off-frame are carefully calibrated to match and supplement the practicals, making the whole thing feel unconstructed. Flat, cold, and slightly depressing — which is the drammatic intention.
Move to the Lab
The studio is set up with: camera on tripod, light kit, shotgun mic, and wireless lav. We'll work through three areas in sequence.
Camera Settings: Know Your Controls
Before we shoot, you need to know what each control does and why it matters. These are manual settings — auto modes make decisions for you, often wrong ones. Take control of the image.
Lens & Optics
- Lens length (focal length)
- Measured in millimeters. Wide lenses (24mm, 35mm) take in more of the scene but distort faces up close. Longer lenses (50mm, 85mm, 100mm+) compress space (shallow depth of field) and flatter the face — better for interviews. Zoom lenses cover a range; prime lenses are fixed and usually sharper.
- Iris (aperture)
- Controls how much light the lens lets in. Measured in f-stops (f/1.8, f/4, f/11). Low f-stop = wide open = more light, shallower depth of field. High f-stop = closed down = less light, deeper depth of field. Iris is your primary exposure control in normal conditions.
- Depth of field
- The range of the image that appears in focus. A shallow depth of field (blurry background) draws attention to the subject and feels cinematic. A deep depth of field keeps everything sharp. Shallow DOF comes from: wide aperture, longer lens, and distance between subject and background. Smaller sensors (like many video cameras) produce inherently deeper depth of field — you have to work for the blur.
- ND filter (neutral density)
- A darkening filter — like sunglasses for the lens. It reduces light without changing color, which lets you keep your iris open (and your depth of field shallow) even in bright conditions. Without ND, shooting outside often forces you to stop down, which kills your background blur and changes your look. Built-in ND filters are common on video cameras.
Exposure
- Shutter speed
- Controls how long the sensor is exposed per frame. For video, follow the 180° rule: set your shutter to double your frame rate — 1/48 for 24p, 1/60 for 30p. This produces natural-looking motion blur. A faster shutter makes movement look sharp and staccato (like Saving Private Ryan). A slower shutter creates smear. Don't use shutter to control exposure in video — that's what iris and ND are for.
- Gain (ISO)
- Amplifies the sensor's signal electronically to brighten the image in low light. The cost is noise — grain and speckle in the image. Use gain as a last resort: add more light first, open the iris first. When you do need it, a little is usually fine; high gain looks rough.
- Zebras / false color
- Exposure aids built into many cameras. Zebra stripes appear over areas that are close to overexposing. False color maps different exposure levels to colors. Use them to expose for skin accurately rather than guessing by eye on a monitor.
Color
- White balance
- Tells the camera what "white" looks like under your current light source so all other colors render correctly. Daylight is blue-white (~5600K); tungsten is orange-warm (~3200K). Auto white balance shifts constantly and creates color inconsistency between shots — always set it manually. Match it to your dominant source, or use a gray card for precision.
- Color temperature (Kelvin)
- A scale that describes the warmth or coolness of a light source. Lower numbers (2700–3200K) are warm/orange (candles, tungsten bulbs). Higher numbers (5500–6500K) are cool/blue (daylight, overcast sky). Mixing color temperatures in a scene creates color casts that are hard to fix in editing.
Frame Rate
- Frame rate
- How many still frames the camera captures per second. Common options: 24p feels cinematic — the standard for narrative film. 30p is slightly smoother, common for documentary and web video. 60p is very smooth and "video-like" — use it intentionally for slow-motion, or avoid it if you want a film look. Higher frame rates are not inherently better; they just look different.
Audio
- XLR inputs
- Professional balanced audio connectors — the standard for external microphones (shotgun, lavalier). They reject interference over long cable runs and accept proper mic-level signals. If your camera has XLR inputs, use them. Mini-jack (3.5mm) inputs are a fallback, not a choice.
- Audio levels
- Set manually. Watch the meters while recording and aim for peaks around –12dB. Never let levels hit 0dB — that's digital clipping and it cannot be fixed in post. It's better to record slightly low and boost in editing than to record distorted.
- Room tone
- Record 20–30 seconds of silence at the start of every location — just the ambient sound of the space with no one talking. This gives your editor a clean bed of "nothing" to fill gaps, smooth cuts, and match the acoustic character of the room across the whole scene.
1. Camera Settings: White Balance + Exposure
- Set white balance manually — never leave it on auto (the camera will shift color as light changes)
- Expose for skin tone, not the background — protect the face
- Keep the look repeatable: same brightness, same color temperature throughout
- Watch for mixed light (window daylight + tungsten lamps) — they don't mix cleanly
2. Lighting Setup: Build Three-Point, Then Simplify
- Start with key only — see what it does to the face
- Add fill and observe how shadow depth changes
- Add back light — feel the separation appear
- Check: clean shadow shape on far cheek, no raccoon eyes, no harsh nose shadow
- Soften with distance, diffusion, or bounce; then remove a light — work toward the minimum that still reads
- Try a practical lamp in the background: match key direction to its logic
3. Sound Recording: Make the Voice Clean
- Mic placement beats fancy gear — get the mic close without entering frame
- Monitor levels: avoid clipping; it's better to record slightly low than distorted
- Record room tone: 20–30 seconds of "silence" before the interview starts
- Listen actively for: HVAC hum, handling noise, clothing rustle, traffic — fix it before you roll
Practice Interviews
Teams of three rotate through roles: lighting/camera-sound / interviewer-subject. Record a 20–30 second clip per setup. Goal: sculpted face, clean audio, consistent exposure.
Interview Conduct: Presence, Listening, Rhythm
- Ask open prompts that invite stories, not yes/no answers — "Tell me about a time when…"
- Don't fill the silence — let thinking happen on camera; those pauses are often the best moments
- Hold the shot 5 seconds before and after the answer begins and ends — give yourself editing handles
- Keep the subject's eyeline consistent: interviewer stays camera-side and doesn't move
- Make the subject comfortable: small talk before rolling, explain what you'll ask, remind them it's a conversation not a performance
- Pay attention — they can feel when you stop listening; genuine attention is the most important thing in the room
Group Project Introduction (15%)
This is your transition into the major group production for the semester. Teams of 3–4 will make a short in one of three modes:
- Fiction: performance, blocking, dramatic lighting, controlled mood
- Documentary / Essay: voice, listening, observational style, "truthful" lighting choices
- Hybrid AI Short: live-action + AI viserts, synthetic textures, remix strategies, experimental voice
Every short must actively consider framing, color, lighting, sound, and editing. I may assign a shared constraint or theme (for example, a PSA topic) so the class can compare very different approaches to the same starting point.
Forming Groups: Bring one rough idea you're curious about. We'll form groups around shared interests and compatible roles — who's directing, who's running camera, who's sound, who's lighting, who's editing — and plan rotations so everyone learns the full workflow.
Note on AI integration: Experiment with workflows that combine live-action shooting with AI tools (visuals, voice, texture, remix, or hybrid scenes). For in-class demos I'll use my own account for generating video.