
Due Dec 3: The Capstone Project is due on Thursday, Dec 3rd at 9:10am. All Capstone Project files (Photoshop, Illustrator, Premiere, and/or After Effects files), as well as your rendered files (mp4 or png files), must be submitted via the class OneDrive to the Capstone Project folder. Allow enough time for all of your files to be uploaded too!
Capstone Project Presentation Schedule:
Dec. 3:
Angelique
Alisa
Thea
Gabrielle
Marianna
Brody
Dec. 8:
Kai
Jei
Synia
Peyton
Miranda
Josiah
Mailei
Dec 10:
Erin
Cameron
Michele
Heather
Matthew
Brynna
Andrew
Due Dec. 1: Work In Progress Critiques & In Class Studio day: I need several volunteers to present their Capstone Projects so we have plenty of time for all remaining Capstone Project presentations to happen on Dec 3, 8, & 10. If you present on Dec. 1st, you are not presenting your work again. Send me an email or message on Slack if you want to present on Dec. 1st.
FYI: The Capstone Project is due on Thursday, Dec 3rd at 9:10am. All Capstone Project files (Photoshop, Illustrator, Premiere, and/or After Effects files), as well as your rendered files (mp4 or png files), must be submitted via the class OneDrive to the Capstone Project folder. Allow enough time for all of your files to be uploaded.
FYI – No Class on Nov. 24th & 26th (Thanksgiving Break). Take care of yourself and stay safe!
Due Nov. 17: Homework #11: Upload your Work In Progress of your two Media Objects. Your website counts as Media Object #1, so submit either your Remix, Infographic, or Animated Infographic to the class OneDrive folder: Homework #11 WIP 2 Media Objects. Make sure you name your folder: Last name_First name_Capstone and within it you upload your working & reference files (Photoshop, Illustrator, Premiere, and/or After Effects files) as well as your rendered files (mp4 or png files).
Keep working on all media objects in your Capstone Project and bring in all of your files so you can work and ask questions during class time. We will be using a portion of class time to critique each other’s designs.
NOTE: I’m allowing you (if you want) to submit a redo of Homework #10 by Thursday, Nov. 12th at 9:10am. Please submit your improved Homework #10 into the Homework #10- REDO folder on the class OneDrive.
Due Nov. 10: Homework #10 due: Using the Capstone Website template file as a starting point for your Capstone Project website, create 3 HTML files with internal links to your other pages in your navigation bar, 3 external links to your proposed capstone project subject matter, and a 250-word Capstone Project proposal posted on your homepage (4 points). On one of your pages, embed one of your Vimeo videos (using the <iframe> tag), on another page embed a linked 1200x800px (height by width) png file (placeholder for your infographic) (2 points). Create one external CSS file that has your styling for your 3 pages and includes that CSS file in a folder with your 3 HTML files.
Your 250-word Capstone Project proposal needs to describe the subject matter and direction you are going to take in your Capstone Project. Which two media objects will you complete for your Capstone Project? How do your two media objects relate to each other and your chosen subject matter? Keep in mind the subject matter for your Capstone Project needs to be focused on a social or cultural topic and please contact me if you have any questions about your chosen topic.
Be creative with your layout and styling of your 3 HTML files in relation to your Capstone Project (color palette, font choice, etc.) and include your iframe video code from Vimeo. Here is a video on embedding your Vimeo video in HTML. Upload your Last name_First name10 folder with your four files to the Homework #10 folder to the class OneDrive.
Due Nov. 3: Complete ch. 1, 2, & 3 of this tutorial on HTML/CSS from Code Academy so you are more familiar with HTML & CSS. Keep in mind that you do NOT need to purchase a pro account with Code Academy. NOTE: We will not be completing ch. 4, & 5.
NOTE: I’m allowing you (if you want) to submit a redo of Homework #9 by Thursday, Oct 29th at 9:10am. Please submit your improved Homework #9 into the Homework #9 REDO folder on the class OneDrive. 🎃🍬
Due Oct. 27:
1) The entire 30-second animated infographic is due. Refine the timing of the animation’s text and imagery through the use of keyframes in relation to the audio (4 points). Make sure you upload to the class OneDrive your AE project, Ai/Psd/mp3 files, Works Cited PDF, and your final rendered animation (Last name_First name8Final.mp4) (1 point). Render using Adobe Media Encoder (with H264, Match Source-High Bitrate) and make sure the exported video file is 1280×720 at 24fps with audio (1 point). Check out the video below on exporting via Adobe Media Encoder.
2) Create a free (not pro) account with Code Academy.
3) Download Sublime Text (works on both Mac and PC) or any other source code editor. We will be using Sublime Text to write our own HTML & CSS code in class.
Due Oct. 20:
The first 15 seconds of your 30sec animated infographic is due. Develop the timing of the animation’s text and imagery through the use of keyframes in relation to the audio (4 points). Render using Adobe Media Encoder (with H264, Match Source-High Bitrate) and make sure the exported video file is 1280×720 at 24fps with audio (1 point). Name your file: Last name_First name8.mp4 (1 point). Submit your After Effects project file, all Ai/Ps/mp3 files, Works Cited PDF, and rendered animation mp4 file in a folder (zipped is fine!) to the class OneDrive folder.
If needed, use the “Dependencies > Collect Files” option to make sure all of your files are collected in one project folder.
Make sure to check out the Adobe After Effects tutorials on animating essentials!
Here is a video on rendering out your Composition from AE to Adobe Media Encoder:
Due Oct. 15th:
Bring in your Illustrator, Photoshop, or AE text/imagery you drew yourself for the first 15 sec. of your 30 sec. animated infographic to introduce the viewer to your animated infographic topic in After Effects. Collect the URLs to your sources & audio files in a word doc named: Last name_First name8.docx. We will have in-class time for troubleshooting the first 15 seconds of your animated infographic which will be due on Tuesday, Oct 20th.
Due Oct. 13th:
1) Choose your topic for your 30-sec animated infographic and turn in a hard copy of the storyboard for your proposed 30 sec. animated infographic to the Homework#7 folder on the class OneDrive. Include a quick summary/breakdown of each scene with a sketch of the imagery that will be within the frame of the scene (4 points). Make sure you consider the duration of each scene and any movements or animations of your imagery (1 point).
2) Find a Creative Common’s audio track for your proposed animation so you are ready to start designing your imagery and animating to the audio.
Due Oct. 8th:
1) Watch these tutorials on getting to know After Effects, select and animate layers, keyframe animation, and parenting.
2) Choose your topic for your 30-sec animated infographic and be ready to discuss it with the class.
Due Oct. 6th:
1) Download and install Adobe After Effects.
2) Homework #6 due: Use 4-5 Creative Commons video files (not the ones on the class OneDrive or shown in class) to create a 1 min. video remix on any subject matter of your choice though it must be suitable for a general audience. Manipulate video on a timeline and combine video files for a remix utilizing what you have learned about Fair Use, copyright, and the Creative Commons. Consider the juxtaposition and content of the videos when edited into a sequence, as well as the sound design of your remix video (4 points). Export your remix using Match Source-High Bitrate (make sure your video is HD – 1920x1080px or 1280x720px) preset with H.264 format and AAC audio (1 point). Name your exported file: Last name_First name6.mp4 and upload this file along with your Premiere project file and a PDF with the links to all of the videos you used to the Homework #6 folder (1 point). You can use the audio from the Creative Commons videos we used in class or any other CC audio file.
Check out this video on exporting out of Premiere Pro:
Due Oct. 1:
1) Download Premiere Pro and watch these Adobe video tutorials on working with panels, importing and editing within Premiere Pro.
2) Locate 4-5 Creative Commons or Public Domain video files (not the ones on the class OneDrive or shown in class) on any subject matter of your choice though it must be suitable for a general audience. These files with be the basis for creating a video remix for Homework #5.
3) Here are several examples of remixes from previous classes:
Due Sept 29:
Homework #5: Utilizing the editing techniques shown below, create a 45-second mashup with 4 Creative Commons or Public Domain licensed files. Work with storytelling and juxtaposition in your mashup and precision with your editing of all of the 4 audio tracks (2 points). Export your 45 sec. long mashup audio as an aiff (or .wav) file named: Last name_first name5.aiff (or .wav) (2 points). Upload this file to the Homework #5 folder on the class OneDrive folder along with the Audition project file folder (contains your .sesx file, 4 audio files, and a PDF with URLs to each audio track) (2 points).
NOTE: I highly recommend you Zip (or Compress for the Mac folks) your Project Folder if it is not uploading all of your folders/files. Make sure that you only use audio files that are under Public Domain or a Creative Commons use and remix license.
Due Sept 24:
1) Optional redo of your Homework #4 file is due at 9:10 am. Upload it in the Homework #4 folder on the class OneDrive.
2) Watch these Audition tutorials: intro to Audition, importing and browsing media, and audio mixing to get yourself familiar with Audition.
3) Locate 4 Creative Commons licensed audio files and save the URLs of the audio files to a Word doc so you are ready to bring them into a new Audition multitrack project.
Due Sept 22:
1) Homework #4: Create an infographic that visualizes four statistics about a single topic through the use of text and imagery. In Illustrator, create an RGB file that has an artboard that is 800x800px at 72ppi (1 point). Design the visual layout of text and hand-drawn imagery in Illustrator to develop the designs of your infographic that relate to your statistic. Consider how your color palette and font choice relate to your topic and make sure to include the URL to your data information at the bottom of the infographic. Work with layout, type, color, shape, movement, and legibility to create a visually-engaging infographic (4 points). Keep any reference imagery you trace embedded in your file. Duplicate your text layers and outline the duplicated text (except the URL) if you used an uncommon font for any text (1 point). Make sure your file is named: Last name_first name4.ai and uploaded into the Homework #4 folder on the class OneDrive folder.
2) Download Adobe Audition. We will begin audio editing today in class.
Due Sept 17:
1) Come up with a proposed topic for your infographic and find at least four data points on that topic. Be ready to discuss your topic with the class.
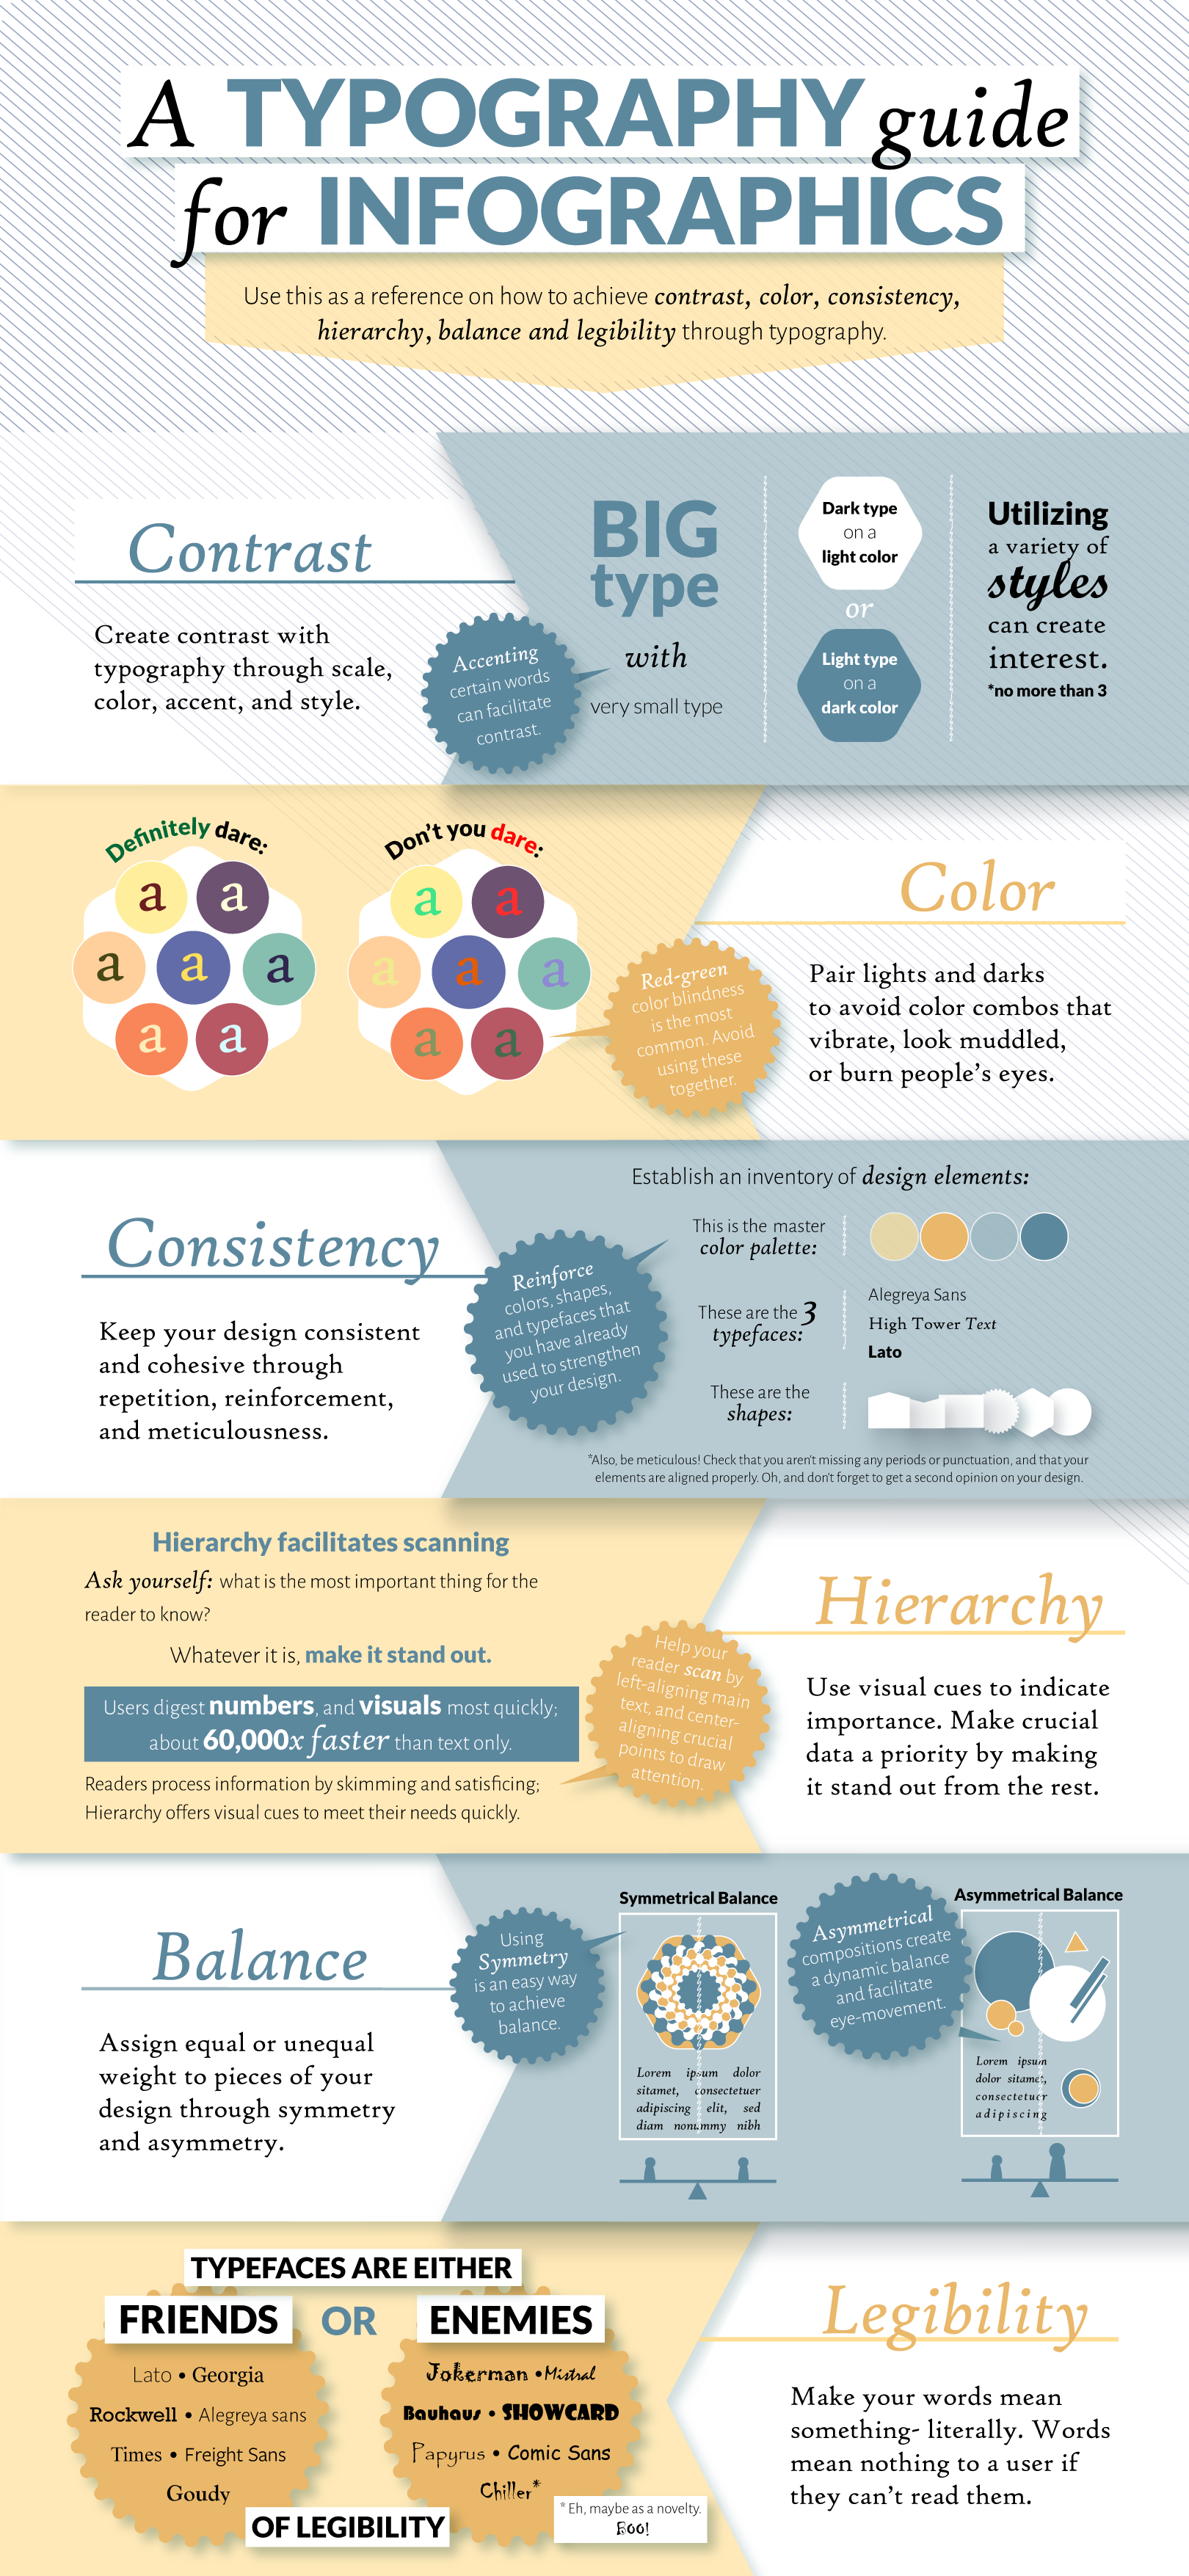
2) Look over Anna’s Typography Guide and Lindsey’s 10 Universal Laws of Design.
3) Watch this tutorial on creating type in Illustrator.
Due Sept 15:
Homework #3: Take a photo of yourself and draw a vectored image of your self-portrait at 1280px x 720px (length by height) 72 ppi, RGB color mode. Use the layering technique I demonstrated in class and place your embedded image in a layer in your Ai file with 1280×720 dimensions (2 points). Make sure your layers and sublayers are organized and labeled (2 points). Use the Pen Tool approaches demonstrated in class to create a vector-drawn a self-portrait (2 points). Here is one approach and another approach to drawing your vector self-portrait with the Pen Tool. Make sure your file is named: Last name_first name3.ai and uploaded into the Homework #3 folder on the class OneDrive folder.
Due Sept 10:
1) Watch Changing Color and Strokes in Illustrator and Start Creating with the Pen Tool video tutorials.
2) Find or take a photo of yourself that is at least 1280px x 720px (length by height) 72 ppi.
Due Sept 8:
1) Homework #2: Create a redesign of an iOS mobile app launcher icon in a psd file that has a pixel dimension of 250px x 180px (height x width) at 401 ppi. Work to simplify the design considering the current flat style of iOS13 and Apple’s Human Interface Guidelines.
I am looking for the use of the pen tool to create the vectored imagery in your redesigned app and include small text with the name of the launcher app icon below the 180px x 180px shaped app icon (2 points). Do not round the edges of the app icon (Apple takes care of it). Keep your layers organized with groups that are labeled (2 points). Include an embedded source image of the old app icon design on a layer in your properly named document: Last name_first name2.psd (2 points). Upload your psd into the Homework #2 folder on the class OneDrive folder.
2) Download Illustrator so you are prepared to start working on it in class on Sept 8th and watch the beginner level “Illustrator Get Started“ video tutorials – Get to Know Illustrator and Create and Edit Shapes.
Due Sept 3:
Read over Apple’s Human Interface Guidelines on app icons and find a mobile app icon that is horribly designed. Consider our discussion in class about what constitutes good and bad mobile app design. Bring to class the app icon file (either as a screenshot from your phone or off the web) and be ready to discuss it with the class.
Due Sept. 1:
Homework #1 – Resize this image to create three psd files with these exact three names and corresponding dimensions (width x height) and resolution:
- Last name_first name1A.psd file which is 1334 x 880 at 326ppi
- Last name_first name1B.psd file which is 1920 x 1080 at 401ppi
- Last name_first name1C.psd file which is 180×180 at 72ppi
Use both Image Resize and the Crop tool to achieve these exact pixel dimensions and resolutions. Make sure all of your files are named as listed above. I am looking for proper file naming and file types (2 points) and accurate dimensions and resolutions (4 points). Note: None of your files should be pixelated, squashed, or stretched.
Make sure you have these files uploaded to a Last name_First name1 folder inside the Homework #1 – Three Resized Images folder by the start of class.
Due Aug. 27:
1) Complete the Student Survey and Syllabus Scavenger Hunt.
2) Download Photoshop on your computer. Double-check that your computer meets the system requirements of the different Adobe apps we will be using in the class.
3) Watch this intro to Photoshop and this image resizing tutorial.