Generative AI Concerns
“We write this letter today as professional artists using generative AI tools to help us put soul in our work. Our creative processes with AI tools stretch back for years, or in the case of simpler AI tools such as in music production software, for decades. Many of us are artists who have dedicated our lives to studying in traditional mediums while dreaming of generative AI’s capabilities. For others, generative AI is making art more accessible or allowing them to pioneer entirely new artistic mediums. Just like previous innovations, these tools lower barriers in creating art—a career that has been traditionally limited to those with considerable financial means, abled bodies, and the right social connections.”
– from an Open Letter of to Congress from over 70 Artists using Generative AI
Posthuman Cinema
The PHC artist collective (Will Luers, Chad Mossholder and Amerika), in human-AI symbiosis, improvises with each other and with AI tools such as RunwayML, Midjourney, ChatGPT, GPT-4 and ElevenLabs to probe a new kind of language-driven cinema art and explore a cinematically manifested collective unconscious.
Episodes:
9. Ghost Presence
10. Neural Theater
Generating Story Ideas:
Instructions for ChatGPT:
You are an expert in movies, filmmaking and visual storytelling. You are able to break down a written story or text into its visual parts, each part described in under 320 characters so that an AI image or video generator would be able to create visual images of the original written story.
I want you to help me create prompts for an AI image generation tool. I want to generate 5 images to help me visualize my story. I will write my story summary below and you will come up with 5 images to visualize key moments in my story. Provide ONLY a single-paragraph shot description for each moment to convey the setting, characters, situation, style, mood – explicitly. Do not write headings or titles to each shot. Just paragraphs.
For each shot description, repeat the description of the setting and/or the character(s), regardless if the same details were in the previous shot. Do not assume shot details are carried over from one shot to another. Don’t refer to a previous setting or character. , Describe the whole image again from scratch.
Here is my story:
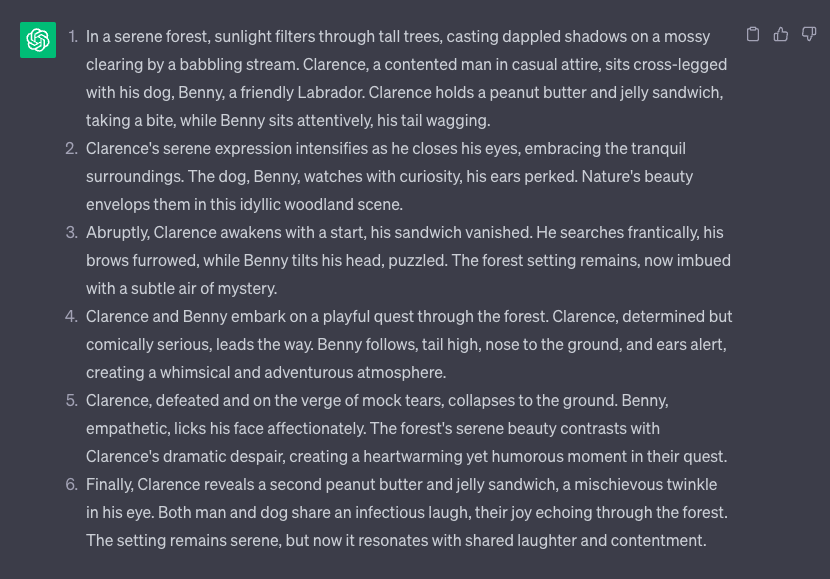
“In a serene forest by a babbling stream is Clarence and his dog, Benny. Clarence enjoys his peanut butter and jelly sandwich while Benny watches. Clarence closes his eyes to savor nature’s beauty. The dog watches as the man wakes up. Where is his sandwich? Clarence and Benny embark on a playful quest to find the missing sandwich. Then Clarence collapses in mock tears as Benny licks his face. Eventually, Clarence reveals a second sandwich, and they both shared a laugh and a bark.”
Rework the results for each shot by using the same descriptive language for setting and character. Specify lighting, genres, filmstock, director styles:
Camera & Film Types
- “Camcorder” – film grain, noise, and saturation, reminiscent of VHS tape
- “DSLR” – superior resolution, sharpness, and clarity
- “GoPro” or “GoPro Video” – fish-eye effect, often in the form of a selfie
- “Disposable Camera” – a fixed-focus 35mm lens
- “Polaroid” – high black point and faded effects
- “Fujifilm Superia” – High-performance, high-speed color negative film with fine-grain
- “Instax” – Daylight color film with a high gloss finish
- “Kodak Ektar” – retro hues or poppy contrast
- “Kodak Gold 200” – crisp and clear results for bright, sunny days
- “Kodak Portra” – vivid colors, light, and textures in a crisp format
- “Velvia” – High-saturation film [
- “Lomo” – oversaturated, high-contrast look with a soft blur
- “CinemaScope” – old filming technique known for its 2.35:1 aspect ratio
- “Kodak 400TX” or “Tri-X 400TX” – fine-grain black and white images
- “VistaVision” – high-resolution widescreen format using 35mm film
- “Technirama” – double the resolution of anamorphic 35mm film
- “Tintype” – direct positive images on thin metal coated with dark lacquer or enamel
- “Calotype” or “Talbotype” – paper coated with silver iodide, vintage look.
- “Ambrotype” – underexposed glass negatives placed against a dark background
- “Daguerreotype” – highly detailed images on a sheet of copper plated with a thin coat of silver without using a negative
Camera Angles:
- Eye-level: A neutral camera angle at the subject’s eye level, providing a natural perspective.
- Low-angle: Looks up at the subject from below, emphasizing dominance or power.
- High-angle: Looks down at the subject from above, making the subject appear smaller or less significant.
- Dutch angle (or canted angle or tilted angle): The camera is intentionally tilted to create disorientation or unease.
- Overhead: Looks directly down on the subject from above, offering a unique perspective.
- Bird’s-eye view: Captures scenes from a high vantage point, providing scale and context.
- Drone view: An aerial angle achieved using a drone.
- Worm’s-eye view: Looks up at the subject from ground level, creating a dramatic perspective.
- Ground-level view: Captures the subject from near the ground, often neutral in perspective.
- Side view: Captures the subject from the side, achieved through various camera angles.
- Off-center view: The subject is not centered, creating a dynamic composition.
Shot Types:
- Close-up (closeup or CU): Focuses on a subject’s face or detail to emphasize emotion or importance.
- Extreme close-up: Tightly frames a small detail or feature, highlighting its significance.
- Wide shot: Shows the entire subject within its environment for context.
- Extreme wide shot: Captures a large area to establish a location or set the scene.
- Medium shot: Captures the subject from the waist up, commonly used for dialogue scenes.
- Medium-full shot (American shot): Frames the subject from knees or mid-thighs up.
- Over-the-shoulder shot: Looks over one subject’s shoulder toward another, enhancing depth in dialogue scenes.
Lighting Styles
- Natural Light: The use of available light sources, such as sunlight or ambient indoor lighting, to illuminate a scene. Often used for a realistic and unobtrusive look.
- Key Light: The primary and most intense source of light in a scene. It provides the main illumination on the subject and establishes the direction of the light.
- Fill Light: A secondary light source used to reduce shadows created by the key light. It fills in the shadows without creating additional strong highlights.
- Backlight: Placed behind the subject, the backlight separates the subject from the background and creates a rim of light around the subject, adding depth and dimension.
- Rim Light: Similar to backlighting, it’s positioned to create a thin line of light along the subject’s edges, emphasizing their outline and separating them from the background.
- Top Light: Light that comes from above the subject, casting shadows downward. It can create a dramatic or mysterious look.
- Side Light: Positioned to the side of the subject, it creates shadows that add depth and texture. Commonly used for film noir and dramatic scenes.
- High Key Lighting: A style that uses bright, even lighting to minimize shadows and create a cheerful or upbeat atmosphere.
- Low Key Lighting: Characterized by strong contrasts between light and dark areas, often used for dramatic or suspenseful scenes.
- Rembrandt Lighting: Named after the Dutch painter Rembrandt, it features a key light placed at a 45-degree angle to the subject, creating a triangle-shaped highlight on the cheek opposite the light.
- Three-Point Lighting: A standard lighting setup that includes a key light, fill light, and backlight, providing control over shadows and highlights.
- Chiaroscuro: An artistic lighting style that uses strong contrasts between light and dark to create a visually striking and dramatic effect.
- Practical Lighting: Incorporating actual light sources within the scene, such as lamps, candles, or practical fixtures, to create a natural and realistic look.
- Candlelight: Emulates the soft, warm glow of candlelight, often used for romantic or intimate scenes.
- Silhouette: Lighting the subject from behind, completely darkening their features and creating a distinct outline against a brighter background.
- Soft Lighting: Achieved by diffusing the light source, resulting in soft, gentle shadows and a flattering, even complexion.
- Hard Lighting: Uses direct and unfiltered light sources, creating sharp, well-defined shadows and a more intense look.
- Bounce Light: Reflecting light off surfaces, such as white boards or walls, to soften and redirect the illumination.
- Practical Effects: Using real-world light sources and techniques to achieve specific lighting effects, like flickering flames or dappled sunlight.
- Stylized Lighting: Employing unconventional or artistic lighting techniques to create a unique visual atmosphere, often seen in experimental or avant-garde filmmaking.
Visual World Building:

At this stage, you are just trying to work at setting and ideas about character types and what they are wearing. Edit the shot descriptions to better refine your vision of the story to prepare for your image or video prompts. Be as descriptive as you can.
Open Midjourney and try using the description as prompts.
- keep creating variations until you are happy with the result
- upscale the images you like, create variations with added prompts until you get what you are looking for
- use the setting “zoom out” on images if you need more of the setting or a wider shot.
- you can also combine your own image with another image created with another prompt
- you can also add more description to any image to get more variation.
- try in-painting to fit the image more to your vision or idea
Generating Characters
To build images of characters, play with /blend and /describe. Zoom out for wider shots of the body and the setting. Use in-painting to edit regions and refine with more descriptive prompts.

Reverse engineer the image and get descriptive text for use in the video generator. This will come in handy if the images aren’t working well.
/describe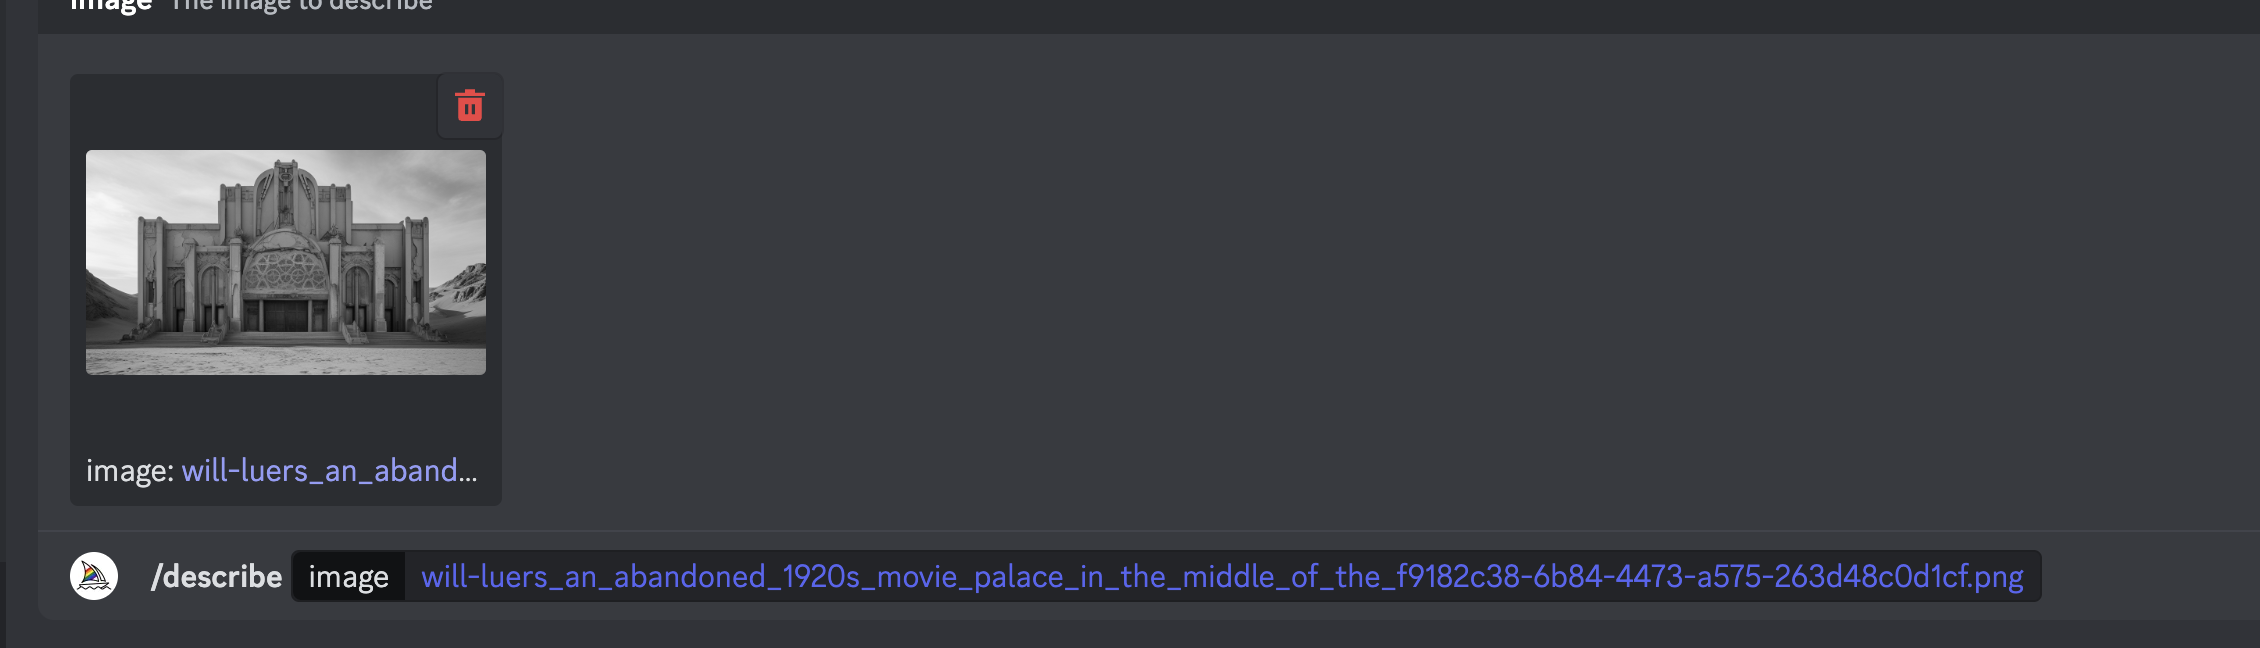

Generating Video Clips
Open RunwayML
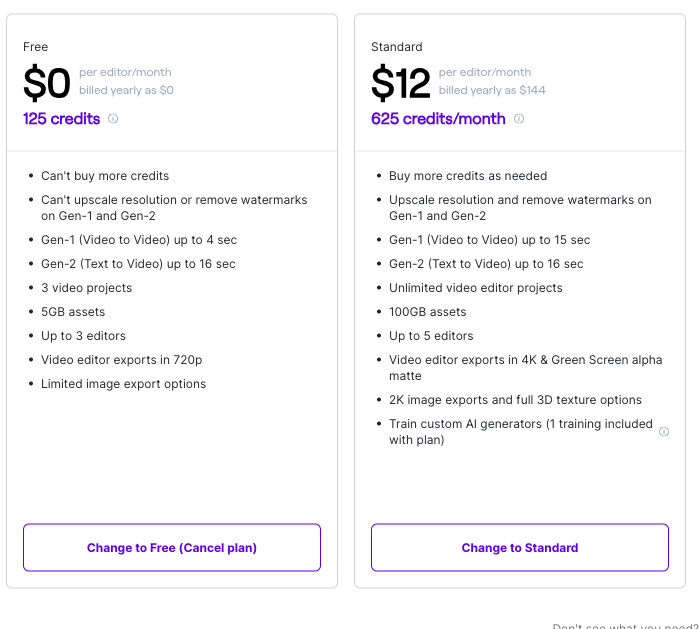
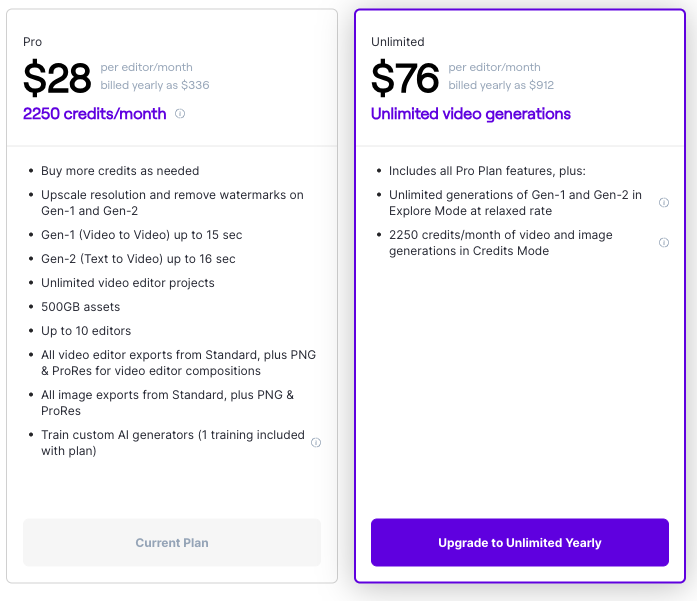
You can do many things with this AI video tool: easy green screen, slow motion, frame interpolation, remove objects in the frame. Generate video from other videos and prompts. I will focus on the video AI effect Gen 2. This means you can generate video from a prompt, generate video from an image or from an image and a prompt.
You create 4 seconds clips and can extend a single clip to up to 18 seconds.
Gen-2 Tutorials:
Extend Generations in Gen-2
Gen-2 Modes
Gen-2 Workflow w/ AI Magic Tools
Gen-2 Basics
Edit Video
Import your generated video clips into Premiere and start putting it together.
Try ElevenLabs for AI generated voices.
AI sound design?