Zach Heller: Framing project Cats
A framing video of my cats in their tree and Baymax(the big grey one coming to greet the camera).
Editing for Continuity
A Health Journey
Continuity: Duel
The scene I will be using as an example of continuity is the train scene from Duel. This scene uses a lot of continuity edits, but in particular mostly cut in/match on action shots and shot reverse shots.
In the beginning extreme long shots are used to showcase the setting (a train track). To start the action, a shot reverse shot is done to get the initial reaction of the main character when the truck hits his car for the first time. We see him being jolted by the hit, then a cut to the front of the truck against his car, and then back to the main character as he begins yelling.
From then on, there are a lot of cut-in shots, which are used in multiple different ways. For one, we get shots close to the car window so we can focus on the main character, and then cuts to longer shots that allow us to see the rest of the car. This allows us to see what is going on both with the main character and outside of the car, where the truck is hitting. It is also used to get a close up of the certain areas of the car being affected. For example, a long shot is done on the car, then a zoom in onto the wheels which are being pushed towards the train. This helps the viewer understand the truck’s intentions of pushing him into the moving train.
We see a lot of shots of the main character also turning around, or looking outside his window, to then immediately cut to the truck hitting him, his car wheels struggling to move the car, or the train getting closer, and then back to his face (shot reverse shots).
Overall these continuity shots help the viewer understand the intentions of the truck driver and the dangerous situation the main character is in.
Blog Post 9/4
For this assignment I chose the scene where our main character is stopped at the train and the antagonist pulls up behind him and starts forcefully ramming his car closer to the train in hopes to cause the protagonist to crash into the moving train. I chose this scene for the chaos and consistent frame changes. This section of the film is made up of primarily empty frames and match on action shots. This scene is highly intense and is a pivotal moment for our main character as he realizes this guy genuinely is out for blood and it’s no longer just dueling leap frog down the road like previously.
When the truck first pulls up behind the protagonist it uses a shot reverse shot to present the scene as if the viewer is right alongside the main character by showing us exactly why his car is being rammed as he figures it out at the same time. This use of shot was a good way for the director to make the audience feel as if they ARE the main character. This helped rope in viewers for the building intensity to come as the scene continues to ramp up.
Next is a series of empty shots showing the gravity of the situation and how dangerous it will be if the truck driver is successful in his attempt to push the car forward. These also help the viewer get a clear image of the surroundings and further build the image in our heads as if we were really there!
There is also many match on action shots of zooming in and out from the character, to the full view of the car, then to the front wind shield, to the full front view of the car, and so on. This framing helps set the scene and build a detailed view of the entire situation from all angles and the viewer is able to better understand the intensity of what’s taking place.
There is so much movement of the angles and frames. it helps build the intensity of this scene by going back and forth between so many different shots of the wheels then the train moving then back to the wheels and BACK to the train moving to inflict a sense of urgency and danger on the viewer. I think that this constant frame change makes the scene seem super quick as if “it all happened to fast” which is a common emotion we feel after being in an intense scenario such as the predicament our protagonist is in.
Thank You.
Blog Post 2 scene road trouble
Continuity is very important and is demonstrated very well in Spielberg’s movie Duel. I am going to use the scene called Road Trouble.
The first scene is a cut-in/ match action with a close of David at the end of the cut-in. It then cuts to a 180-degree shot with David in front to show emotions before the truck driver loses it. A few shots after this are close-ups of David’s face from the perspective of his windshield. Spielberg keeps this angle on David only zooming out a bit to not be over-saturate with the close-up.
The next big close-up is at the gas station and it’s of the truck itself. This more or less shows the difference between David and this truck driver.
The editing of the shots makes the scene seemingly continuous which is if not the best thing to make a space believable. in terms of the narrative the fact that the scenes are made to look like they are in somewhat real-time with very few jump-cuts. There are no empty frames as the audience is supposed to be with David throughout almost of the whole movie. The few cuts were to change angles and locations. The most major cut is when David is pulling into the gas station to show the calm of David’s driving and the shock of the truck driver’s driving.
Post 2: Continuity – Duel Ending Scene
In Steven Spielberg’s early film ‘Duel’, he masterly utilizes many continuity tricks in quick order to create drama and emotion. During the ending scene, the success of these edits builds the scene to a dramatic climax and conclusion.
The final 4 minutes begin with a ‘Motivated POV’ shot of the protagonist, David, as he sits in his car, staring out. He watches the empty road, waiting for the Peterbilt truck that’s been chasing him to emerge. This second shot, waiting for the truck, is an ‘Empty Frame’. This builds the viewers tension as they wait for the inevitable.
The ‘Motivated POV’ repeats as the truck starts barreling down the road towards him. This is also a ‘Shot Reverse Shot’, as David sees and then reacts to the truck.
There is then a ‘Match on Action’ edit of the truck, zooming in dramatically with a shaking camera. The viewer sees David again from the front, before switching to a shot of him from behind, following the ‘180-degree rule’. These dramatic changes of framing maintain the intense and quick pace of the plot.
Spielberg then uses ‘Parallel action / Crosscut’ edits of David’s car and the truck speeding towards one another from the front, which could be considered a ‘Graphic Match’(?) of the trucks front and the cars.
The shots shown of David’s car as it collides with the truck follow the ’30-degree rule’, changing from the front right to the far back left of the car as it is struck. This allows the viewer to see the collision more clearly, while maintaining a sense of positioning relative to the car.
By using these editing skills throughout the ending, Spielberg builds and maintains the intense and frightening pace and tone that has been built throughout the film. This is necessary for creating a climax and conclusion that can satisfy a viewer who has been made tense alongside David for the entirety of their viewing experience.
Blog post 1: Kingdom of Heaven
The film I chose to analyze as “Kingdom of Heaven” (2005) scenes shown here are very simple shots yet they are dramatized, using slow motion and close-ups.

[Medium Low Angle Close-up]
By using this angle the characters are given their power dynamic of that time one is looking down and one is looking up. it also establishes the reveal of the secondary character.

[Close-up]
This shot establishes the reveal of the secondary character.

[Medium High Angle Close-up]
The shot solidifies the main characters power dynamic.


[Medium Close-up]
The shot establishes that both characters are now with equal power dynamic.


[ Long shot]
This scene establishes the army behind both characters


[ Long Shot Medium]
This scene establish us both armies and their massive size.


[Extreme Long-shot – Wide]
These scenes establishes that both camps leaders are coming to meet.

[Extreme close-up]
This scene establishes another secondary character who is analyzing what’s happening between the two armies.


[Medium longshot]
This scene establishes both leaders coming together.


[Medium Close-up]
This scene establishes both characters as equals.

[Close-up]
This scene establishes the main characters involvement with both armies.

[Extreme Long-shot – Wide]
This scene establishes and explains the position of both armies and their leaders and what they are fighting for.
Why did I choose this film?
I chose this film because of its simplistic cinematography yet establishes very dynamic and very dramatic scenes using different types of shots such as slow motion, dramatic close-ups positioning dynamic it makes you curious as to what they are fighting about what are their intentions what are their motives it is the scene that establishes the cause and plot of the movie.
Blog Post 1
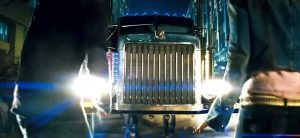
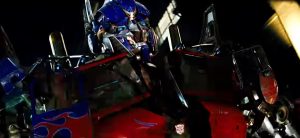
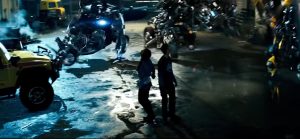
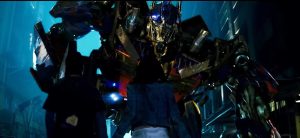
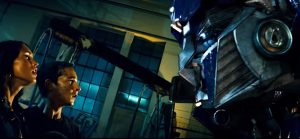
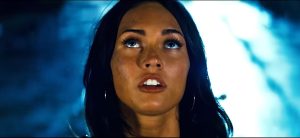
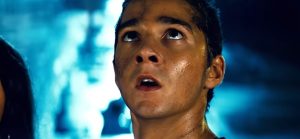
The movie I chose to analyze framing is Transformers (2007). I think there’s some cool scenes that effectively show the difference in scale between the humans and robots.
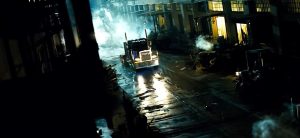
[Long Shot] ^
To open the scene, you see Optimus (the truck) drive towards the human main characters. You get a good idea of the environment and setting, as well as the time of day.
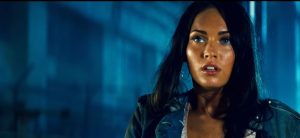
[Medium Close-up] ^
The humans curiously watch Optimus get closer.
[Medium] ^
Sam is far enough in the frame to be a Medium shot, but you also get to see Optimus get much closer to them.
[Long Shot] ^
The camera cuts back to a long shot, with all 3 characters fully in the frame.
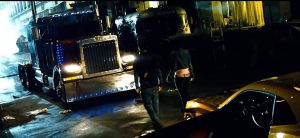
[Medium Shot] ^
As Optimus gets close enough to stop, we obviously get to see how much bigger the truck is than them. Notice how the camera is around waist level instead of their eye level, this makes the robots look a lot taller than they already are.
[Medium Close-Up] ^
The camera is at a low angle as Optimus slowly transforms, and it progressively looks further up and in this frame you can see it with the building perspective.
[Medium Shot] ^
After being in a low angle in the last shot, we’re now in a higher angle shot which can represent Optimus’ point of view. The camera slowly rises too.
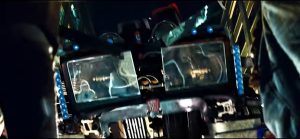
[Medium Close Up] ^
As he slowly transforms, it cuts to a high angle of Optimus. The camera descends and orbits around him to showcase all the little truck parts transforming into place. Next picture is a screenshot during this camera orbit, it’s all one shot.
[Long Shot] ^
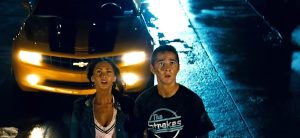
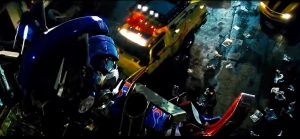
Once the camera finishes lowering and orbiting around him, we see a long shot of the humans being surrounded by the other transformers, who also start to transform. The camera pans around them to show everything happening, and it’s fitting as the humans are also looking around wondering what’s going on.
[Medium Long Shot] ^
Optimus towers over them in another lower angle camera.
[Medium Close Up] ^
[Close Up] ^
[Close Up] ^
The closeups from both humans looking up help us visualize how tall these alien robots are. There are a lot of shots that show either a high angle view (Optimus’ view) , or a low angle view (Human’s point of view). I think the movie did a good job with these different types of angles to show height and size.
Framing for Continuity
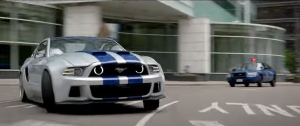 Medium Long Shot: The framing captures the cars from dynamic angles, often low to the ground, emphasizing speed and intensity. The protagonist’s Mustang is framed in a way that shows it in the foreground, dominating the scene. This indicates its importance and sets up a narrative focus on the car chase.
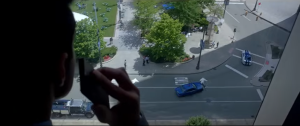 Long Shot: The overhead view changes the dynamic of the chase, offering a strategic overview. This shift contrasts with the close, ground-level shots and gives the audience a broader sense of the environment and the chase’s progression through the city streets. The top-down view allows the audience to see multiple elements at once—both the blue car involved in the chase and other aspects of the environment, such as the city layout and pedestrian activity. This comprehensive view creates a sense of scale and context, situating the chase within a larger urban setting.
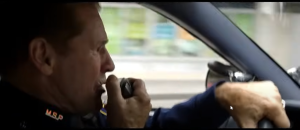 Medium close up/close up: The tight shot, focusing on the cop’s face, hand on the steering wheel, and the radio, creates a sense of immediacy and tension. It suggests that the situation is critical, and every moment counts. The slight blur in the background indicates motion, keeping the viewer aware that this is happening during the high-speed chase.
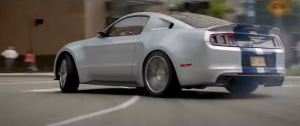 Medium long shot: The rear shot of the Mustang drifting around the corner, as if viewed from the perspective of the cop car, places the audience directly in the chase. This perspective mimics what the pursuing cop would see, enhancing the viewer’s connection to the intensity of the pursuit.
The combination of close-ups, top-down views, and dynamic chase shots builds and sustains tension throughout the sequence. By alternating between the perspectives of the protagonist, the pursuers, and the observer, the film keeps the audience on edge, fully engaged in the unfolding action.
Blog Post: The Hunger Games Mockingjay
The hospital bombing scene in District 8 illustrates the violent effects of the ongoing war in their area. The scene begins with a hollow mood inside the hospital, where Katniss Everdeen and others are waiting for an attack by the capital. The peace is suddenly broken by the sound of enemy aircraft, leading to a massive explosion that destroys the hospital and causes several injuries and deaths. The camera work in this scene plays a role in showing the chaos and impact of the bombing. Handheld and shaky camera movements made a feeling of nervousness and urgency, allowing the viewers to be connected to the scene (as they are placed in the middle). Close up shots of characters, especially Katniss, show the person’s fear and distress, emphasizing how scared and nervous they were. Wide shots show the extent of the destruction surrounding them, making a broader view of the damage while placing the close-ups that focus on individual reactions. The camera also directs the attention to the aftermath which was smoke, debris, and injured people. This showed the significant impact of the attack on both the people and their surroundings leaving them with a feeling of injustice.

1: MCU – Medium Close Up (Wide)

2: MCU – Medium Close Up (Wide)

3: M – Medium (Wide)

4: Slightly low camera angle with medium shot (Wide)

5: CU – Close Up

6: CU – Close Up

7: CU – Close Up

8: CU – Close Up

9: Medium Close Up

10: Medium Long Shot (Wide)

11: Medium Close Up (Wide)

12: Close Up (Slightly Wide)
Framing: The Avengers (2012)
Hello, everyone! For this blog post, I will be framing and analyzing the iconic Avengers circle-up scene.
The 2012 Avengers movie is one of the biggest and most iconic superhero movies of all time, and for good reason. The cinemetography, the character interaction, the well-paced writing that kicks off the beginning of an incredible story arc, and the action all makes this a movie that is enjoyable on every single rewatch.
Shots and references: We start with Bruce Banner arriving in the middle of the Battle of New York, establishing all but one of the core Avengers in a wider shot as the conversation begins, before closing in on the heroes to get more details.

Long shot, behind, wide angle


Medium shots, over the shoulder style-ish?

Medium close up shot, frontal
We then cut away to an almost direct perspective shot of Tony Stark, aka Iron Man, as he prepares to bring Bruce a Chitauri Leviathan to fight. We’re then brought back to the grounded heroes, to remind us of the aerial capabilities of this beast as they are all looking up and out off camera to watch it approach.

Close up shot, frontal view

Long shot (to capture the scale of the Leviathan), frontal

Medium shot, zoom, over Bruce’s shoulder

Medium, zoom, frontal shot

Medium close up, zoom, frontal

Long shot, frontal

Medium shot (to help capture the size of the creature, behind
We then get to watch both the heroes and the enemy approach to capture both the scale of the city and feel the intensity of the battle that is about to tip towards the heroes’ scales, with the awakening of the Incredible Hulk.

Medium shot, behind Captain America, wide lens (to include the Leviathan)

Medium close-up, zoom, frontal shot

Medium shot, wide lens (to include the beast), behind Bruce

Close up shot, zoom (focused on Bruce, but you can still see the beast approaching)

Medium shot (watching the Hulk emerge as it grows), zoom, side shot

Long shot, wide lens (helps capture the size of the Leviathan and just how strong the Hulk is), behind Hulk
And with the Leviathan wounded, the Avengers manage to destroy the beast and officially begin the Battle of New York, with wide shots to show the army they still have to fight, as well as unique and never before seen shots in the entire movie.

Long shot, side view, wide lens (to help keep the Hulk in frame)

Extreme long shot, high, wide lens

Medium shot, zoom, frontal shot

Medium shot (chosen thanks to how much of Thor is in the shot, low angle (to help the viewer also feel the power of that explosion), zoom

Long shot? (It’s full body but I didn’t know if it was zoomed in enough to qualify as medium), high angle (to show him hiding behind the car)

Medium close-up shot, wide lens (to include more of the army), zoom to focus on the main grunt in front, frontal shot

Medium shot, wide lens (to include all of the Avengers), frontal shot
The continuity is held up remarkably well, as several of Hulk’s shots are quick cut shots to show the sequence from a different angle, yet they still feel realistic enough to help us see a better picture of what’s happening. And the narrative purpose of the scene, as said, serves as the turning point and the excitement that the entire movie has been building towards up to this point.
-Jeremy Sauter
Blog Post 1: Framing
The scene I decided to deconstruct and examine was the opening scene from the first Pirates of The Caribbean movie. Where the main character, Captain Jack Sparrow, is first introduced on screen.
I’ll first post all shots with a description of what they are then delve into the structure of them.
Here are the shots in order:

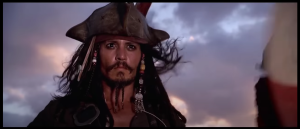
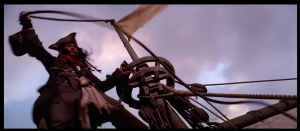
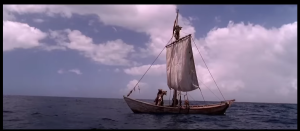
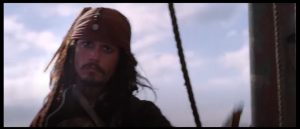

The entire opening scene of the movie is a great introduction to the character we will follow throughout the course of the movie and franchise. Without a single word, we understand this character well simply due to the way it is shot and carried out.
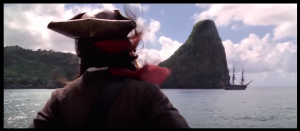
Starting with a slow reveal from behind, a low-angled long shot that slowly transitions into a medium close-up shot from behind. Showing us what he sees or what his goal is in the distance.
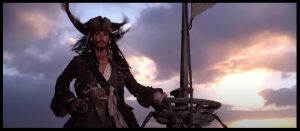
After that, the same shots are almost repeated, a long/medium shot, this time from the front to a more medium close up shot to show the face of our hero. Here it then quickly cuts to another low angle medium shot of him carrying out a sudden action and into a close-up of him bucketing water out of his boat. This then cuts to a wide shot to show his entire ship, which is rather small, and his frantic actions to keep the water out.
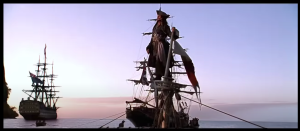
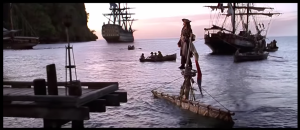
It then abrublty slows down in action to a somber shot of him reacting to some hung pirates, a medium close up shot to show his reaction to this. From here, it carries onto an iconic scene of him once again the top of the mast in an extremely long shot to show this boat is now sinking entirely. Slowly zooming further out to a wider shot to capture the environment he is in and exactly what he will be walking into.
The scene ends up a close-up, not of his face, however. Instead, it is a low-angle close-up of his first steps onto the dock from his now-sunken ship.
Scott’s Introduction Post
Greetings, class! I am Scott David Daron Jr: student at WSU Vancouver and former student of Clark College. I am among many here who are majoring in DTC and taking this class as part of its curriculum.
My history with cinema and filmmaking in general goes back a long way, ever since I was a kid. I’ve been editing videos, such as mini-movies I made for my Elementary School back in the day. I was introduced to editing software and how to utilize it, and even at an early age I was enthralled with the process. I’ve since then been expanding my familiarity and skillset involving not just editing, but also in fields related to it, including the subject of this class: cinematography.
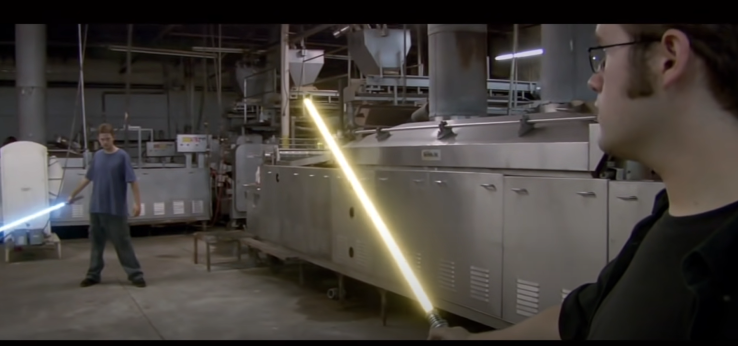
While my choice in what kind of video I want to make can certainly change in the intervening time, the video that stands out to me at the moment of being the type I’d like to make would probably be a little youtube short called “Ryan vs Dorkman 2”
RvD2: Ryan vs. Dorkman 2 — HD (youtube.com)
This is a lightsaber duel cinematic short that was made about a decade and a half ago, yet still holds up remarkably well as a great example of not just fight scene choreography, but also in camera angles and techniques. The sheer amount of variety in this video’s angles, shots, locations, and fighting techniques yet the consistency in the style of each combatant throughout is a work of art. While my video obviously wouldn’t be as heavy in the use of special effects, I still think this could provide a great source of inspiration when it comes to angles and choreography in fight scenes.
Blog Post 1

LS (establishing size)

Medium close up, wide angle
Medium (waist up)
Close Up
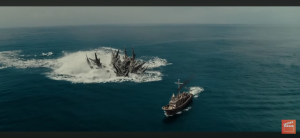
Extreme Long Shot Wide angle
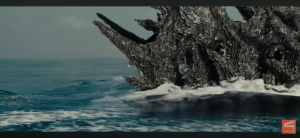
Wide angle
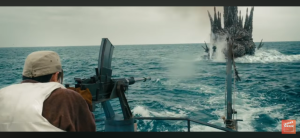
Close Up Wide angle
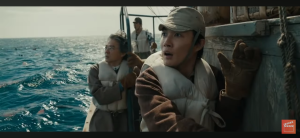
The scene is held together by the use of many wide shots intermittent with close ups to show the audience the massive size difference between Godzilla and the people that are on the boat. Whenever the shots are on Godzilla throughout this scene the camera is often shaky to also give this illusion of power and urgency. When it is focusing on the people it is a steady camera that focuses on never really showing the subjects in full to make them appear smaller, until we are given the last shot of the main character, were he is sharing more screen with Godzilla. This is used to show that the main character has built up the courage to face off with something that is significantly larger then him giving a semblance of equality.