Now for the last step: rendering your image or animation. This is the easiest part of the entire process in terms of what to remember, though it is important to remember some of things I will be talking about.
Before we get to that, however, lets quickly look at the camera options, as this plays a big role in how the image will look in the final render.
First, we need to create a camera that we can animate. To do this, right click the animation set editor and select "Create Animation set for new camera." Alternatively, if you already have an active camera, you can go down to the small box on the bottom-right of the viewport, click the small arrow, and select "Create Animation Set." This turns the camera into a controllable entity.

With that done, lets look at what we can change. For one, you can animate the camera like you would a model, allowing you to make dynamic camera shots. You'll also see a short list of sliders next to the animation set editor. We only need to focus on two sets of sliders:

The Focal Distance and Aperture sliders control depth of field. When you slide the Focal slider, you will see a purple panel, which is what the camera will keep in focus when depth of field is applied. Aperture controls how much DoF there is; the more you slide to right, the more blur you get with DoF applied.
The AO sliders control Ambient Occlusion (AO). AO is the subtle shading between objects and edges, which can be found frequently in most modern games and CG films. These three sliders control the strength, radius, and amount of AO present on screen, so be sure to play around with them, as different lighting conditions will require different amounts of AO.
Alright! We have done all of the necessary things to start rendering your project! What we need to do now is go into the rendering options window. To do this, right click the viewport and select "Render Settings"
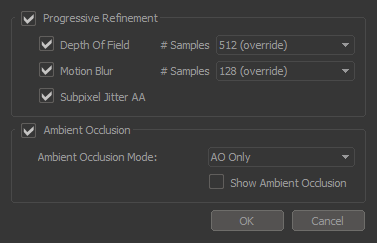
There are four options, but you only need to edit the first two, as the other two cannot be substantially changed: Depth of Field and Motion Blur. The DoF option controls the quality of the depth of field that we previously applied; the higher the number on the right, the better the quality. Keep in mind, this greatly influences the time it takes for the image or animation to render, especially on lower-grade computers.
The Motion Blur option controls the quality of the blur effect made by movement. This option is only neccessary with animations, but it can be used on images to create the feeling of movement:

Choose the options that you think will work for you. Remember that the options you choose will greatly influence rendering time, both on images and on videos. For example, if I were to render out a six second clip of this example with motion blur and DoF at the lowest settings, it would only take around 10-20 seconds. However, if I were to render the same clip at the settings I usually use (DoF 512, Motion Blur 128), the clip would take up to 6 minutes to render. It doesn't sound like a lot, but that's significantly higher than the render at low settings.
Now to start actually rendering the project. If you go up to file, you'll see the option "Export." From there, you'll see "animation" and "poster."
Both have different options, but they have the same object, that being a folder select. This shows where the image or animation will go when rendering is complete. By default, it will go into SFM's "sessions" folder, but if you click the "..." button, you'll open an explorer window that lets you select where the file will go, as well as give the file a name.
The export poster window only has a few options: a small box that lets you customize the size of the image (the image will always be at a 16:9 ratio, so the height/width will automatically adjust), and a box that lets you change the format of the image (SFM will always export a TGA image, but you can still export in PNG or JPEG).

The export animation window has a few extra options. It has the option to render at 720p, NTSC, or PAL, and to export in different formats, including GIF. Additionally, if you click on "More Options," you'll be able to access the rendering options and change them from there. Once you're satisfied with your settings on either the poster or animation window, just click on "Export" and SFM will do the rest!

And that's it! You have successfully made your first SFM project! You've taken the first step in becoming an SFM animator. But don't think this is all you can do. You can find additional tutorials for more advanced SFM tools, tips, and tricks all over Youtube. You can also find a plethora of useful resources on the official Steam Workshop, all of which are freely available for you to download and play around with. There is a whole world of possibilities with SFM, and this tutorial is only the beginning, so get out there and get started!