Collaboration Tools
Presentations
Google Slides is a presentation program used to create, view, and share presentation slides.
How to use Google Slides:
- To get to the website, you can go to the Google homepage search bar.
- At the top right, there is an icon that has six dots shaped in a square. Click on it.
- Multiple apps will be shown, scroll until you see a yellow icon titled “Slides” and click on it.
- Once you click on it, the icon will ask you to log in with a google account.
- Once logged in, you will be automatically taken to the Google Slides homepage.
- Once you get to the Google Slides homepage, there should be a blank slides template with a plus sign at the top left.
- Click on it.
- This will open a new slides document for you to create and edit your presentation.
- To change the theme of your slides, there will be a scrolling bar on the right of your screen that automatically pops up and shows previews of the different themes built within the program. If it is not there, there is a “theme” button at the top of the screen.
- If you want to personally customize your slides, you can add text, images, background, color, and more which can all be found on the top bar. Either through the correlated buttons themselves or by using the “insert” and “slide” tabs located at the top bar.
- You can share your slides to view-only or for people to collectively edit on it as well. To do so, click the “share” button located at the top right of the screen.
- If you haven’t already, Google Slides will prompt you to name your project first (which is optional).
- Once naming (or skipping) that part, you will then be prompted to share with people you wish to have access to the slides via their email.
- You can then choose the type of access you give those you share it to, whether it be viewer, commentator, or editor.
- Once you have their email typed out and the type of access they gain, you cana dd an optional message before clicking send.
- To share/export the slides, you can either follow the collaboration steps above, or go to “file” at the top of your screen and click download which will then show different formats you can save it as.
Access the website:
Create a Google Slides document:
Edit your slides:
Collaborate with other people:
Share/Export the slides:
Slack:

About SLACK: Slack is a messaging program designed specifically for the office, but has also been adopted for personal use.
Slack is a messaging app for business, and so much more. It’s your company’s home for everyone and everything—your digital HQ. Organized spaces for anything you are working on. Share ideas, set deadlines, and make decisions all while not being together. Productivity on your own terms. Search inside your slack with key words and or for people. Set yourself as available or away.
Channels and how to use them: everyone on your team and for school are in one space
How to use SLACK:
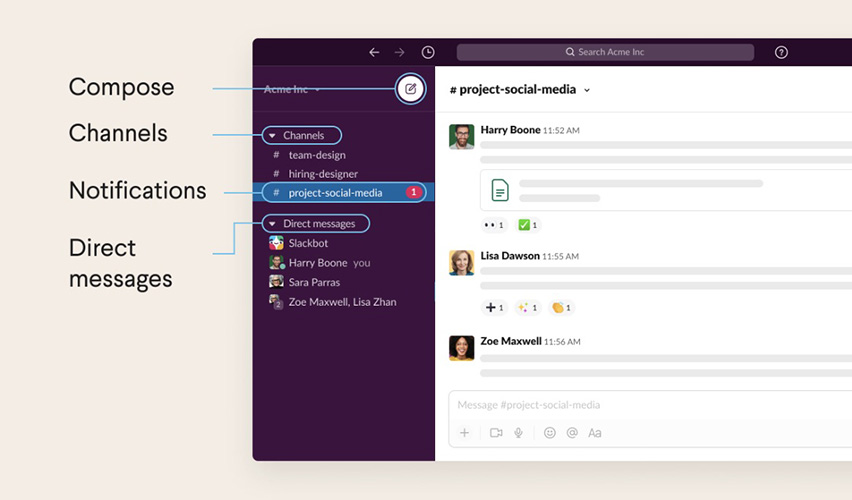
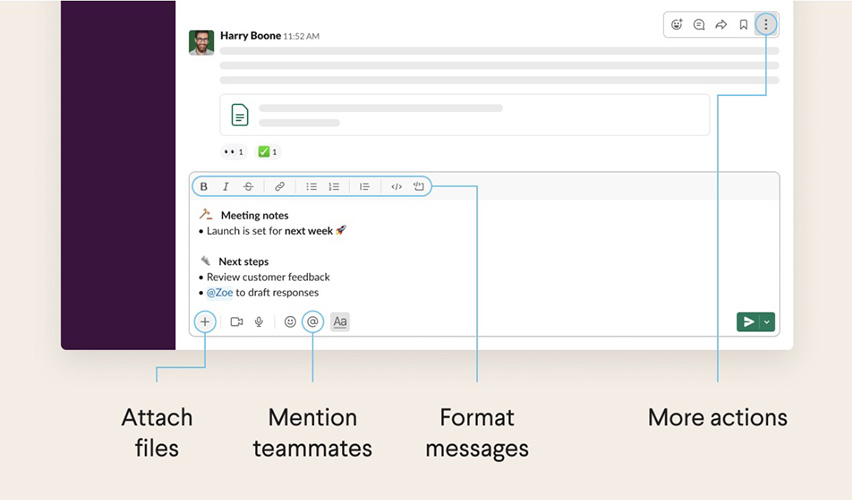
- Sidebar: From the sidebar, you can access your conversations in Slack. You'll see a list of channels you've joined and your direct messages, notifications for specific conversations, and the option to compose new messages.
- Compose: You can use the compose button to write and send a message to any conversation. Messages automatically save as drafts in the Drafts section of your sidebar until you’re ready to send them.
- Channels: In Slack, work comes together in dedicated spaces called channels. Channels bring the right people and information together for any project, topic, or team. Unlike email, discussions in channels are focused around specific topics, so you can join and leave them as needed.
- Notifications in Slack are different from email or other tools you may be used to — they’re designed to make it clear where you’re needed by showing you a badge if a teammate mentions you. When there's new activity, conversation names appear bold in the sidebar.
- Direct messages allow for focused, one-off conversations that don't require an entire channel to weigh in. Use DMs for ad-hoc messages or tasks, like asking your manager a question, or coordinating a call with a teammate.
- Channels: Channels are fundamental to working in Slack — they bring the right people and information together in one place, and make it possible to organize work around a common purpose.
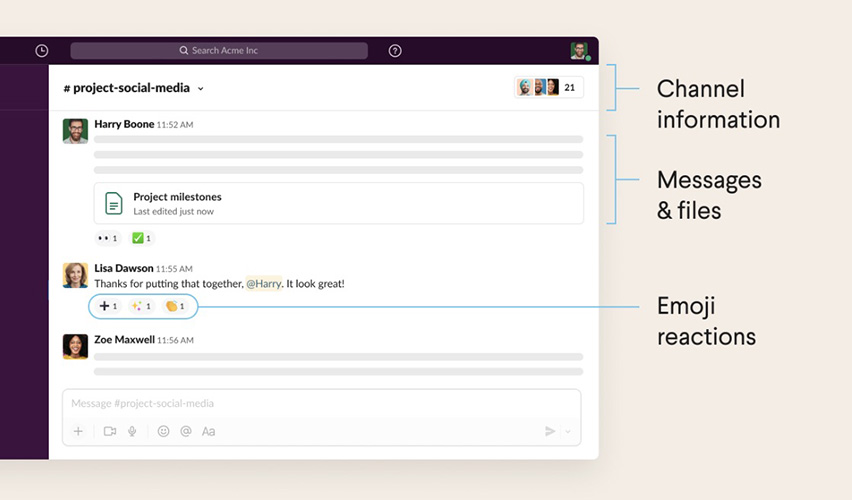
- Channel information: From the channel header, you can access details about the channel you're in. Click the channel name to see details like the channel topic and description, plus any added files. Use the other tabs to see who's in the channel and view other conversation settings.
- Messages and files: Channels provide a dedicated space to write messages and add files. With everything related to a particular topic, project, or team in channels, you can scroll up to see the conversation history any time you open or join one.
- Emoji reactions: are a quick way to respond to any message in Slack. They're both fun and helpful for getting work done — a simple reaction can often replace the need for a follow-up message.
- Message field
- Files: ad files to your messages to share important information alongside your team's discussions.
- Mentions: use mentions to get the attention of specific people in a conversation, whether you need to ask for feedback or follow up on action items.
- Formatting: Format your messages to add a little clarity or pizzazz — bold the most important items, break out thoughts with bullet points, and more.
- More actions: From the more actions menu, you can edit a message after you send a message. You can also delete one you’ve already sent if you need to start over.
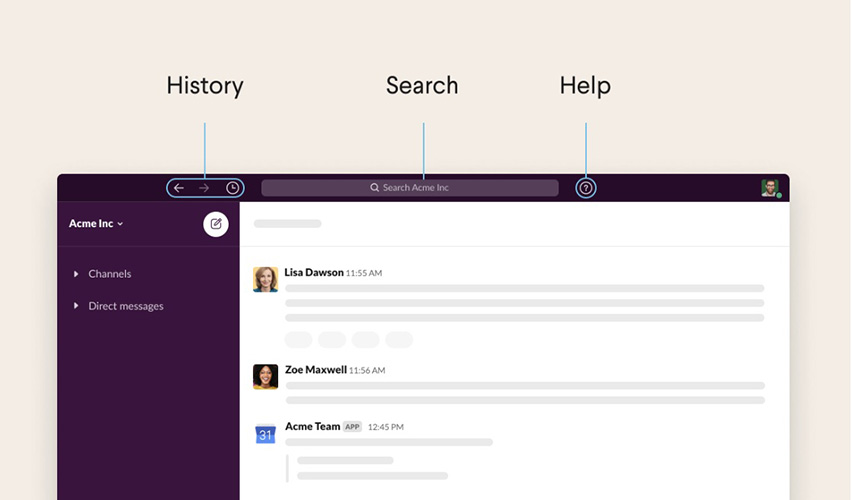
- Nav bar: Use the navigation icons to go back and forth in your history (just like you would in a web browser) or view recent conversations, search for information, or get help with Slack.
- History : The history icons provide quick access to recently-viewed items. Use the left and right arrows to go back and forward in your history, or click the* clock icon for a list of your recent channels, DMs, search results, threads, and more.
- Search : Search your teams conversation history in Slack to find the relevant messages, files, channels, and people you need to get work done.
- Help : Click the question mark icon to the right of the search bar to access help and learning resources
Basecamp:

Basecamp: A deliberately simple project management tool with calendars, to-do-lists, and file-sharing.
Basecamp is a software that allows real-time communication tool great for team collaboration, project management, and even working remotely. Not only is it used on a desktop/laptop, but Basecamp also has an app that can be used on your phone for on-the-go work.
Here are some of the features Basecamp provides:
- A collaboration space that allows you to share projects with other people, view and edit team content, and see/join other projects
- A one-page dashboard for your projects, assignments, and schedule
- An announcements page great for announcements and discussions so you and your team can stay up to date
- A to-do feature to track work, deadlines, responsibilities, progress, and details
- An organized space to create and share docs, files (both physical and cloud), and images
- A campfire great for real-time conversations
- A notification center that helps organize heads-up for deadlines, file uploads, and messages
- A calendar to share to-dos, deadlines, milestones, and more!
How to create a collaborative space on Basecamp:
- If you haven’t yet, create a Basecamp account.
- Once created and logged in, you will be taken to the Basecamp homepage.
- At the top of your screen, you should see a “Make a new project” button. Click on that.
- You will then be prompted to fill in the name of the project, a description of it (optional), a project schedule (start and end date), and an option list on who can access this project (which is broken down to invite-only or all-access mode).
- Once that is filled up, click the “create” button. Your project space will then be created where you can explore the features listed above!
Document-Based Collaboration
Google Docs and Word Documents have cloud capabilities. In order to collaborate with others using Google Docs or Word Document you would need to make sure your document is on the cloud. Google Docs does this automatically as it is a cloud only platform. Microsoft Word is a part of Office 365. If you have Office 365 your document should be synced to the cloud. Usually, through autosave in the desktop app or on the web app directly. Once the document is on the cloud you can invite individuals through the share feature and then you can start collaborating. These services allow you to collaborate simultaneously. If you make a mistake the document is smart enough to reverse your mistake and not what someone else did while you made your mistake. This Technology also works with Spreadsheets and PowerPoint presentations.
Zoom

Zoom is a secure, reliable video platform that powers all communication needs. This includes meetings, chats, phone calls, webinars, and online events, with Video and audio for you to be there without being there.
Zoom is best used on a desktop/laptop
- Sign up or sign into your zoom account
- Click on the link sent to you to join OR enter the meeting ID and password
- Then you will join. This is where you can check your camera quality and sound before you join the meeting.
- After that it is all done, and you officially join you will be in the meeting.
- You can end the meeting or leave at any time by pressing the red button (this will say end meeting if you are the host, or leave meeting if you are a guest)
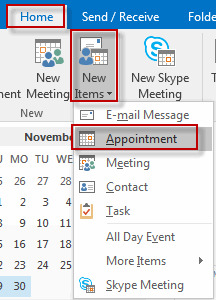
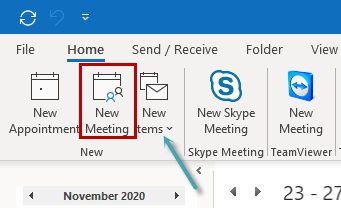
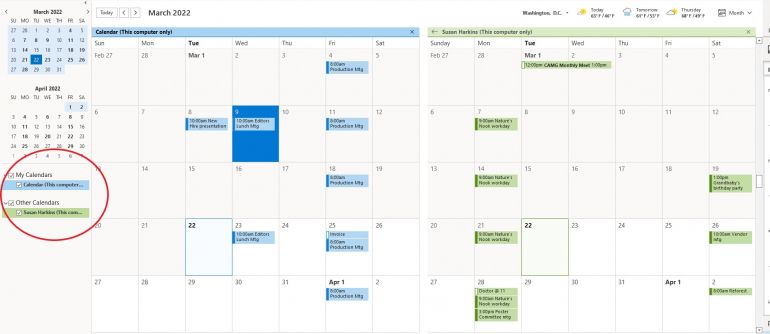
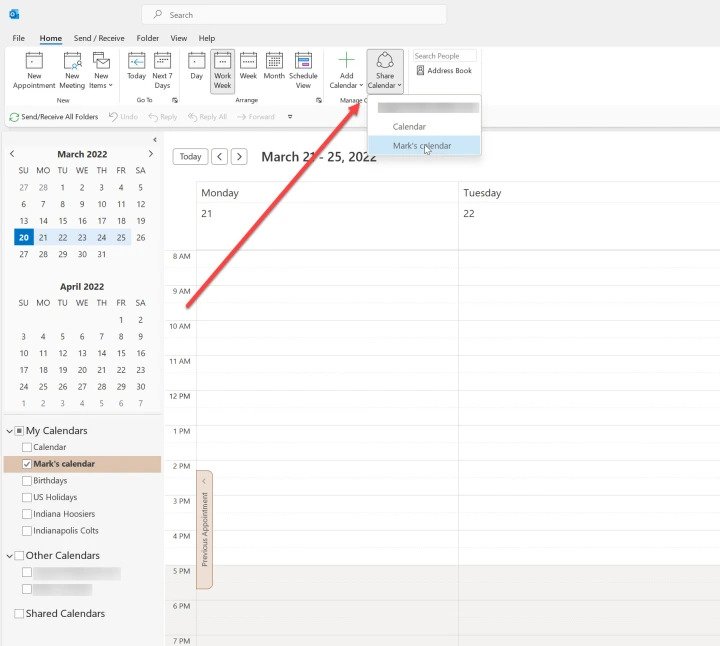
Outlook Calendar

Outlook Calendar: A calendar on outlook which you can create appointments and events, organize meetings, view group schedules, and much more.
How to setup Outlook Calendar:
You can get to your Outlook calendar through the main Outlook login site. Sign in with your Microsoft login information, and this will take you to your Outlook email inbox. On the bottom left side of your screen, you want to look for the calendar icon.
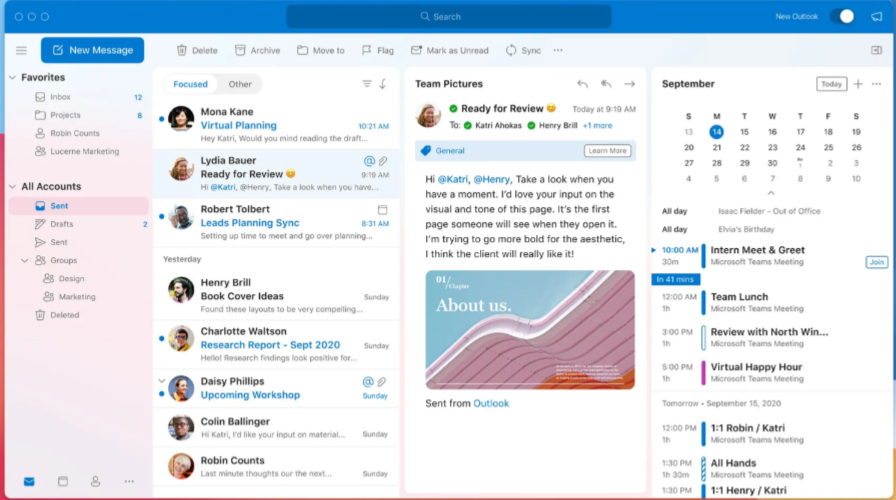
Click that icon to go to Outlook Calendar.
Outlook Calendar features:
Create appointments and events
Click any time slot in the Outlook Calendar and start to type to create your appointment or event. You can opt to have a sound or message reminder of appointments, meetings, and events, and you can color items for quick identification.
Organize meetings
Select a time on the Calendar, create a meeting request, and select the people to invite. As the organizer, you can track who accepts or declines the request or who proposes another time for the meeting by opening the request.
View calendars side-by-side
You can view side-by-side multiple calendars that you created and also calendars you shared by other Outlook users. For example, you can create a separate calendar for your personal appointments and view both your work and personal calendars side-by-side.
Send calendars to anyone through email
You can send your calendar to a mail recipient as an Internet Calendar but keep control over how much information is shared. Your calendar information appears in the body of the email message as an Internet Calendar attachment that the recipient can open in Outlook.
For more details on how to use the Outlook Calendar:
Outlook Calendar: The Ultimate Guide
Figma

Figma is used for creating prototypes or for collaborating on new ideas for the next project. Figma is Free for students and educators. Once a student signs up with their WSU email address they will have access to all the features needed to work with others.
This can be done using Fig jams. Fig Jams are like collaboration documents that have been discussed before but more can be done as images that belong together can be added and notes that belong together can be added and multiple topics can be discussed and organized with the fig Jam this is good for when ideas get overloaded, and the Google and Microsoft Word Documents get overloaded by the content on the document which makes Figma a great platform to use for bigger projects.
Design Files in Figma allow you to do projects and other work within the program. Actual Prototypes or wireframes can also be conducted within the program. Once you know the basics of how to use Figma Then you can design your own projects or work as a team to build them out.
Details on how to use Figma can be found here: